

ReStackor Suspension Response
ReStackor suspension response calculations use the shocks damping force computed by ReStackor pro and inputs of chassis mass and spring rate to determine the bottoming bump velocity of the suspension. There are two ways to bottom a suspension:
-
Hit a bump hard enough to bottom the wheels
-
Hit a landing hard enough to bottom the chassis
ReStackor suspension response calculations compute both limits. The shocks low speed damping controls chassis motions and chassis bottoming velocity defines the shocks low speed velocity range. Wheel bottoming defines the high speed damping force range and the max operating speed of the shock. There is no point in evaluating shock performance beyond that speed as the suspension is bottomed out.
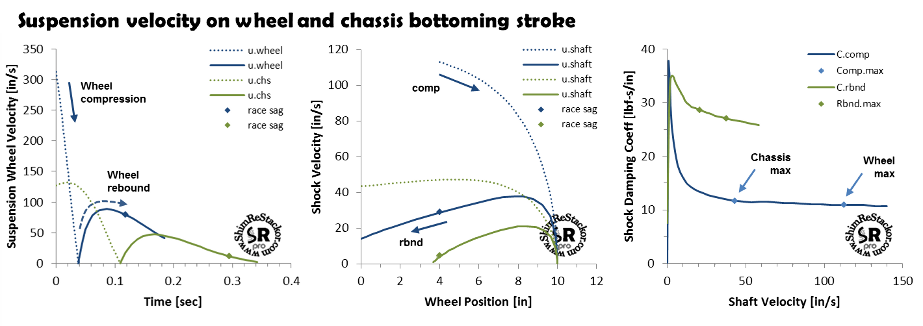
ReStackor marks chassis and wheel bottoming velocities on the shocks damping coefficient curve. Knowing where those bottoming limits occur allows shim stacks to be tuned for control of low speed damping and design of crossover gaps to close at the right velocity for control of high speed damping. Visualizing where those bottoming limits occur on the shocks damping coefficient curve makes tuning both easier and more effective.
Sprung and un-sprung weight
Wheel bottoming velocities are determined using the inputs of wheel weight and spring rate. The shocks damping force and ICS or bladder gas force are computed by ReStackor pro and used in the suspension response calculations. The wheel weight input needs to include the wheel, axle, brake caliper, stanchion tube, chain and everything else bouncing up and down with the wheel. The practical measurement is pull the springs out of the bike and put a bathroom scale under the wheel to get the total weight.
Chassis bottoming is determined using the chassis plus rider weight. Chassis weight is set by the input curb weight of the bike and specified front/rear weight split. Rider weight is determined by the spring force at race sag minus chassis weight.
Chassis bottoming response assumes the rider is standing. On compression the suspension brings both the rider and chassis to rest. Over the compression stroke the rider is assumed to use an additional 12 inches of leg motion to minimize rider deceleration. On rebound the suspension supports both the rider and chassis but the chassis is the only moving damped mass.
![]()
Suspension response
Bump a mass on a spring and it bounces up and down. Put a damper on the spring and the oscillations damp out. For suspension tuning the big question is how much damping does it take to optimize response? Spring-mass-damper theory answers that question.
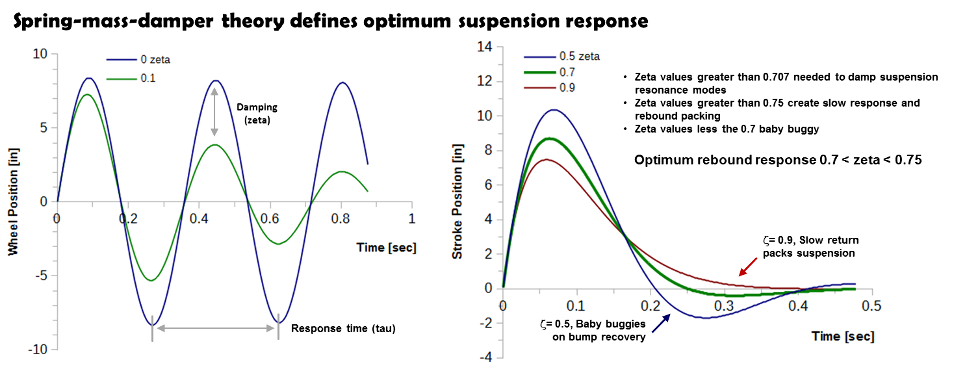
The worst condition for any suspension is hitting the next bump at the point where the suspension is just returning from the previous bump. When that happens residual motions from the previous bump get augmented by the current bump impact. That timing drives the suspension into resonance.
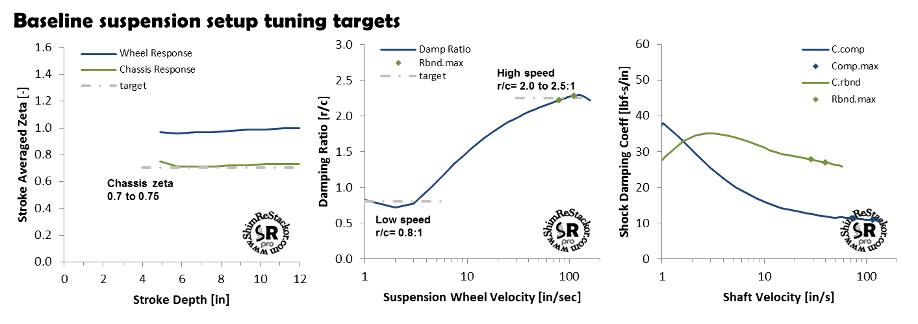
The damping required to suppress resonance is defined by spring-mass-damper theory as zeta values of 1/sqrt(2)= 0.707. Stiffer damping at higher zeta values takes longer for the spring to suck the shock back to race sag and that slow response causes the suspension to pack. Softer damping at zeta values below 0.707 allows the chassis to baby-buggy producing poor chassis “feel”. Zeta values of 0.7 to 0.75 are specified by spring-mass-damper theory to give the fastest possible suspension response with damping that is still stiff enough to suppress suspension response motions. That fact sets the target rebound damping for the baseline setup.
-
Optimum rebound response: zeta values of 0.7 to 0.75
![]()
Compression damping tuning
The rule-of-thumb for compression damping is the ratio of rebound/compression damping needs to be around 2:1. That ratio makes it sound like compression damping is softer than rebound. It is not.
Suspension velocities are the highest at bump impact. High velocities drive the compression damping force up. On rebound, damping fights against the spring force creating a stall speed. Lower velocities at that stall speed drive the shocks rebound damping force down. It turns out that a rebound/compression damping ratio of 2.25:1 creates a peak compression damping force that is approximately equal to the peak rebound force. Equal damping in both directions gives the suspension a symmetric “feel”. That sets the target values for the baseline suspension setup compression damping.
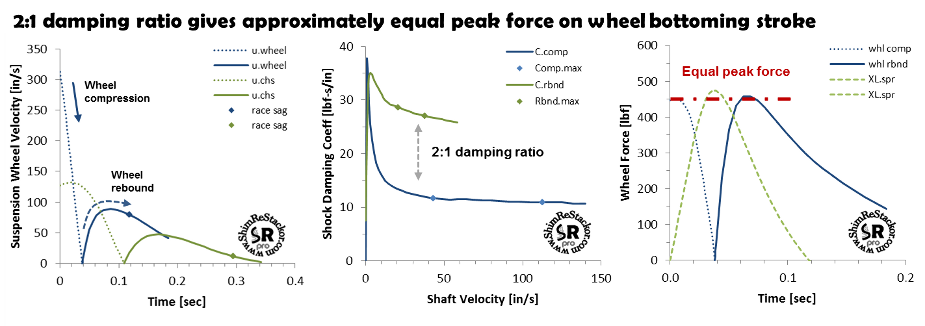
Forks run race sag around 25% of travel, shocks run 33%. Less race sag gives forks more bump travel and that longer bump travel increases compression speeds on the bottoming stroke. Getting symmetric rebound/compression damping forces on a fork requires damping ratios around 3.25:1. Rebound damping for the baseline setup is set by zeta response. Compression damping is set by the ratio of rebound/compression damping.
-
Shocks: 2 to 2.5:1 r/c ratio
-
Forks: 3 to 3.5:1 r/c ratio
Plush vs Fast setups
Target damping ratios for the baseline setup have a range and that range defines the difference between a fast and plush setup. High compression velocities at bump impact make compression damping start with a “bang” and ramp down over the stroke as the suspension slows. To get rid of the bump impact "bang" plush setups use less compression damping pushing rebound/compression damping ratios to the upper end of the tuning range.
The suspension compression force on a plush setup starts low and builds through the stroke as the spring force kicks in deeper in the stroke. That progressive force increase over the stroke defines the “feel” of a plush setup. If that setup is still too stiff you need to go to a softer spring.
Fast setups
Fast setups need more compression damping to resist bottoming. Increased compression damping pushes fast setups to the lower end of the rebound/compression damping ratio range. If the suspension still bottoms at that limit you need to go to a stiffer spring and the stiffer damping needed for that spring. A stiffer spring gives increased bottoming resistance and faster rebound response which helps to prevent packing.

The baseline tuning targets for compression damping have a range and that range defines the difference between a fast and plush setup. If those extremes produce a setup that is still too stiff or too soft you need to go to a softer or stiffer spring. Changing springs is the better option over forcing the setup into an under or over-damped damped condition running damping ratios outside the target range.
![]()
Low speed damping tuning target
Over a series of bumps suspensions will either pack or jack. Packing is caused by stiff rebound damping which prevents the suspension from fully extending between bumps. When that happens the suspension packs down in the travel and continues to pack until the spring force becomes high enough to return the suspension to some partially extended position between bumps. High spring force at that partially extended position makes the suspension ride like a jack hammer. Packing rebound is never a good thing.
Compression damping, on the other hand, pushes the chassis up slightly when hitting a bump. That forces the suspension to run high in the stroke. Lower spring force at that elevated position helps the suspension ride a little more compliant over small trail trash bumps.
On ultra-low speed suspension motions, below 3 to 6 in/sec, compression damping needs to be slightly stiffer than rebound. That keeps the suspension riding “high in the stroke” and prevents packing rebound.
-
Low speed compression: 0.8:1 below 3 to 6 in/sec
At low suspension speeds compression damping forces are in the 10 to 15 lbf range and do not upset chassis ride.
![]()
Tuning targets for the baseline setup
Basic suspension tuning rules-of-thumb define the damping targets needed for a baseline setup.
-
Rebound: zeta values of 0.7 to 0.75
-
Rebound/Compression damping ratio
-
Shocks: 2 to 2.5:1
-
Forks: 3 to 3.5:1
-
-
Low speed damping ratio
-
0.8:1 at 3 to 6 in/sec
-
Spring calculators give a good starting point for tuning a suspension. If that setup is too harsh you need to go to a softer spring. If the setup bottoms you need a stiffer spring. Getting to an optimum setup requires tuning of both spring rate and damping.
Enduro versus MX setups
MX setups run stiff springs to prevent bottoming. Enduro setups run soft springs for improved suspension compliance. Those setups tune compression damping differently to work with the bottoming versus suspension compliance trade.
Enduro setups tune for suspension compliance to get the capability to deal with square edge root and rock impacts. To get a consistent “feel” on high speed hits enduro setups tune the wheel bottoming stroke to give a peak compression damping force equal to the peak spring and rebound force. Those equal forces give the suspension a consistent “feel” through the bottoming stroke on high speed hits. That target is the tuning target of the baseline setup.
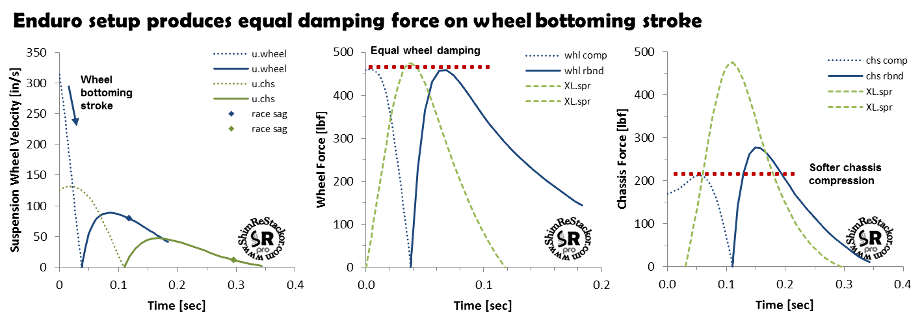
Getting equal forces on the wheel bottoming stroke forces the lower suspension velocities on the chassis bottoming stroke to produce less compression damping. On chassis bottoming the peak compression damping force on an enduro setup is less than the peak rebound force.
MX setups focus on bottoming control for jump landings. To get a consistent “feel” through the chassis bottoming stroke the peak compression damping force on an MX setup is set to be equal to the peak rebound force on the chassis bottoming stroke. Setting chassis compression damping to match rebound requires rebound/compression damping ratios in the 1.6:1 range.
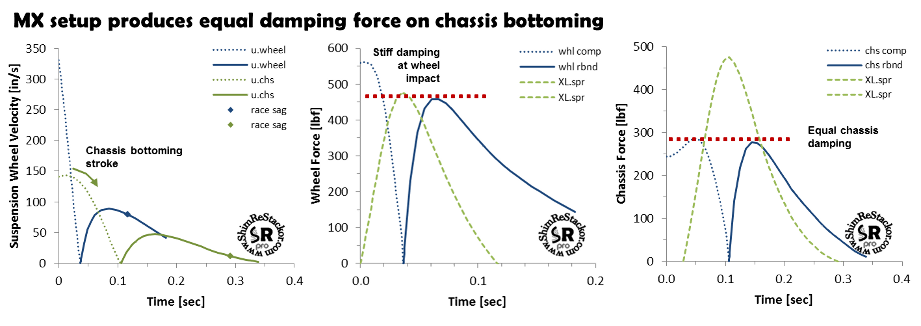
On the wheel bottoming stroke MX setups produce a peak compression damping force that is higher than the peak spring force. That creates a setup that is stiff on bump impact and becomes progressively softer as forces drop to the peak spring force at bottoming. Stiff compression damping on square edge impacts is the reason why MX setups don’t work very well on the trail.
Enduro setups tune compression damping for wheel bottoming control. MX setups tune compression damping for chassis bottoming control. Rebound damping and low speed compression damping are tuned to the usual "rule of thumb" targets. Some MX setups back off rebound damping to get more lift on jump faces, others tune to 0.7 for whoop performance.
Street versus Dirt Bike setups
Street bikes are tuned to the same "rule of thumb" damping targets with one difference. Street bikes damp the chassis for small motions around race sag and switch over to wheel damping at high speed. Getting that transition between low speed chassis damping and high speed wheel damping requires street bikes to run a highly digressive rebound curve.
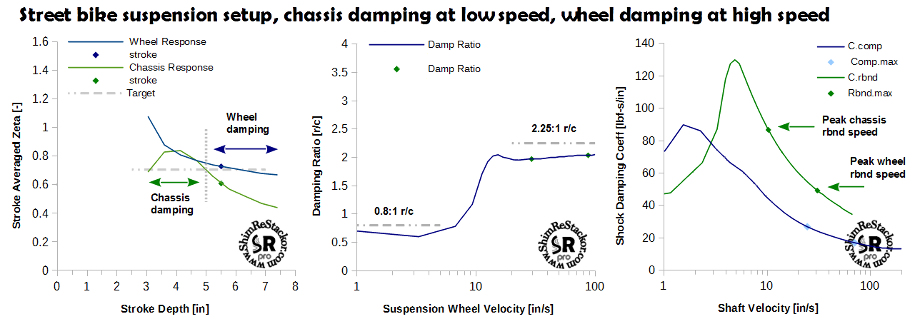
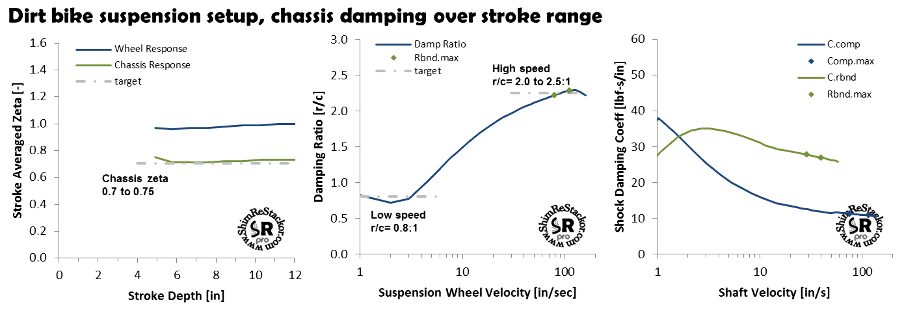
Dirt bikes are tuned with the single focus of controlling the chassis over the entire suspension stroke range. That stabilizes the chassis through whoops, but the stiff damping required for chassis control forces the wheels into an over-damped condition. The fix for over-damped wheels is run the tires at low pressure and rely on tire compliance to suck up high speed terrain motions.
![]()
Spring rate selection
Target damping ratios for the baseline setup define the extremes of a “fast” and “plush” setup. To emphasize the range of suspension “feel” those setups cover the examples below run the extremes of compression damping with the spring rate changed to keep the suspension bottoming velocity the same. The stiff compression damping of a “fast” setup was run with a soft spring and the soft compression damping of a “plush” setup was run with a stiff spring to keep the bottoming velocity the same. Rebound damping was tuned to give zeta 0.70 response for all cases.
| Baseline setup | 5.5 kg/mm spring | 2.25:1 damping ratio |
| Fast setup | 5.1 kg/mm spring | 2.0:1 damping ratio |
| Plush setup | 5.9 kg/mm spring | 2.5:1 damping ratio |
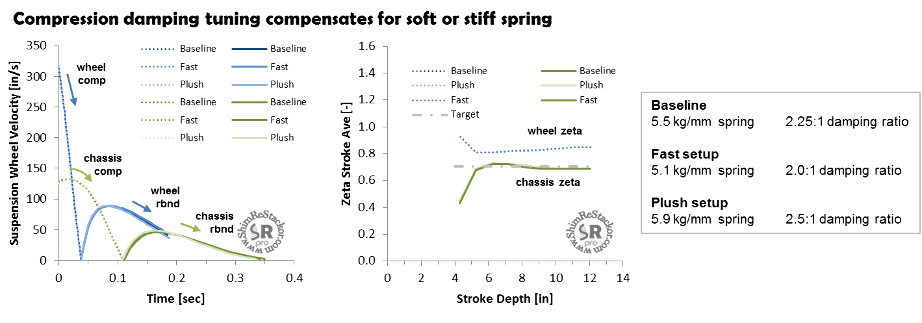
If you only had shock clock data to evaluate those setups you would have to conclude the three setups would all ride about the same. Bump velocities are virtually line-on-line for the three setups. But, each of those setups ride differently. That difference shows up in the force over stroke data.

Fast setup
To get the same suspension bottoming velocity the fast setup runs a soft spring with stiff compression damping. Stiff compression damping creates a high force at bump impact and the softer spring produces less force at bottoming. That creates a setup that is initially stiff but then blows through, i.e. harsh.
The feature of that setup is the softer spring allows more front to rear weight transfer. On acceleration the softer spring produces more rear weight transfer improving traction. Braking increases front weight transfer helping the bike point into corners. Handling improvements created by a softer spring is a favorable trade for some riders and they will put up with harsh compression damping to get the handling improvements of a softer spring.
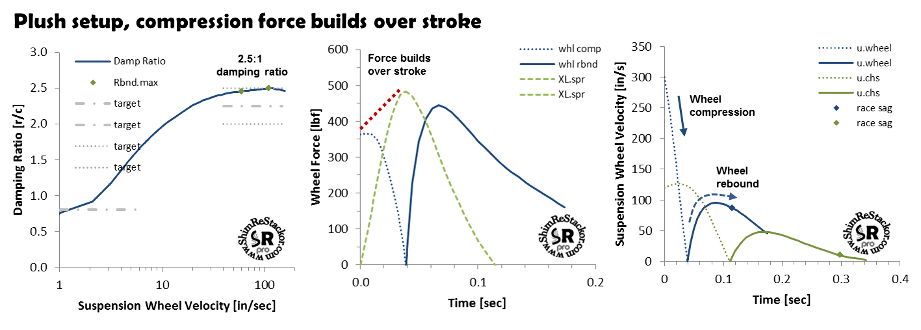
Plush setup
The plush setup runs soft compression damping with a stiff spring. The stiff spring gives the suspension the same bottoming velocity and force profile over the stroke that starts low and finishes high. That progressive force increase through the stroke defines the basic “feel” of a plush setup.
The downside is the stiffer spring suppresses weight transfer and that can create traction problems. Perfecting the balance between plush bump behavior and weight transfer traction requires experimenting through a range of spring rates. For each spring rate change rebound damping needs to be retuned to get zeta values of 0.7 to prevent packing and compression damping tuned to control bottoming. That allows comparison of the setups on an apples-to-apples basis.
Fast vs Plush setups
For the above examples the baseline setup used a 5.5 kg/mm spring. The fast setup went down two 0.2 kg/mm steps to a 5.1 kg/mm spring and compensated with stiffer compression damping. The plush setup went up two rates to 5.9 kg/mm spring and maintained the same bump bottoming velocity using softer compression damping.
The examples span five spring rate steps and maintain the same bump bottoming velocity by retuning compression damping over the 2.0 to 2.5:1 damping ratio range. That damping ratio range covers five spring rate steps and demonstrates there is considerable overlap between the tuning of compression damping and the selection of spring rate.
Getting the right spring is an important step in perfecting a suspension setup. Spring calculators give a baseline. All to often damping is used to cover up a poor spring rate selection forcing the suspension into an under or over-damped condition.
